よくあるヘッダーのボタンを押したらアニメーションでスライドして
メニューが開くViewを作っていきます。
やり方はたくさんありますが、今回はコード量も少なく
シンプルな作り方の説明をしていきます。
①Main.storyboardにUIを配置

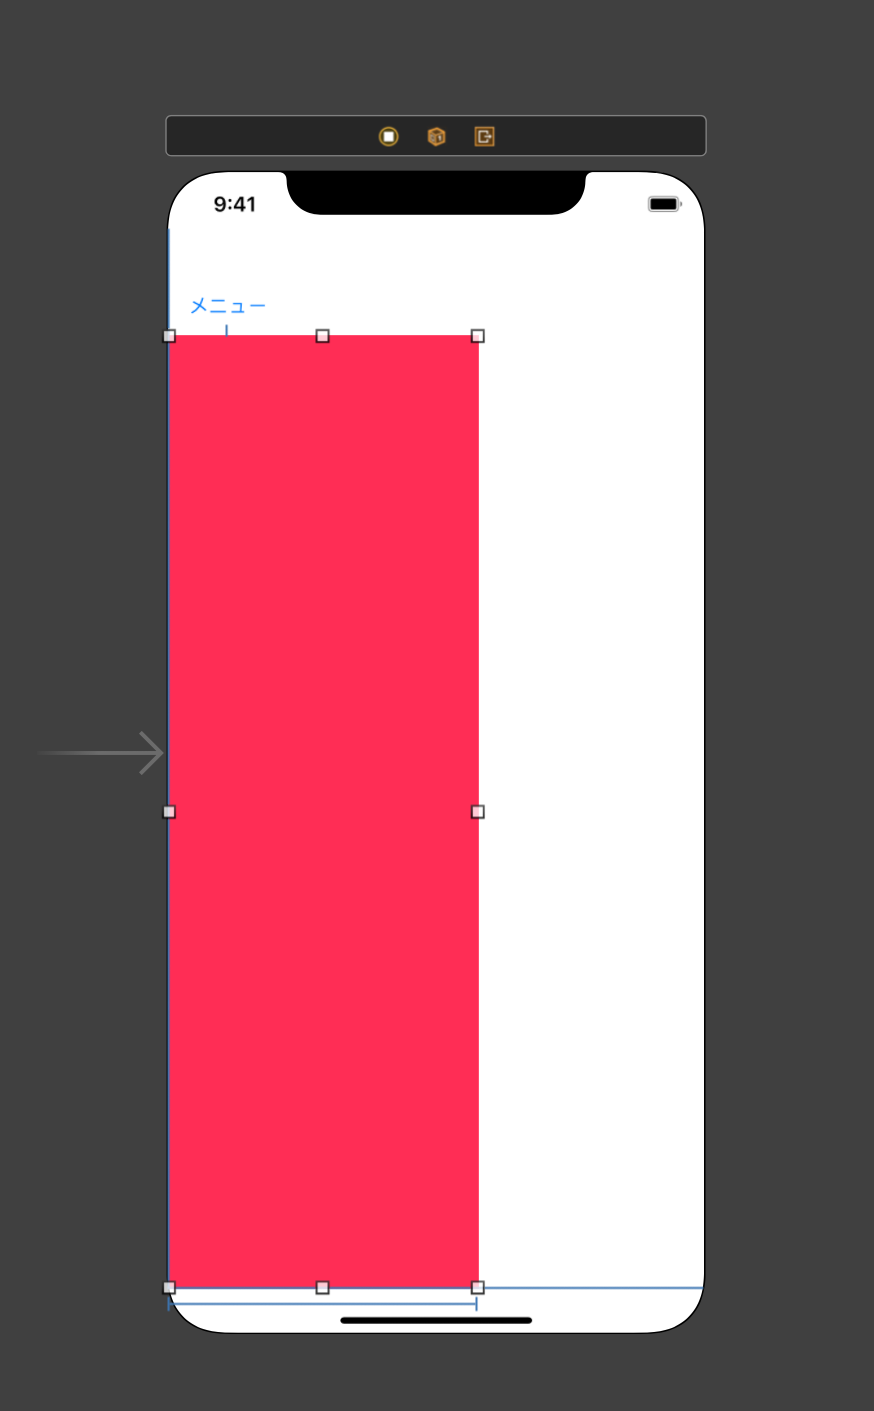
- 左上にUIButtonを配置します。
- 1番で配置したUIButtonの下にUIViewを配置します。
- UIとコードの紐付けを行います。
ここではViewのWidthを240に設定をし、
わかりやすくするためbackgroundを設定しています。
※スライドしてくるViewをリスト表示したい方はここをUITableViewに変更してください
②ViewControllerにコードを書いていく
class ViewController: UIViewController {
    @IBOutlet weak var slideMenuView: UIView!
    @IBAction func touchedButton(_ sender: UIButton) {

    }

    override func viewDidLoad() {
        super.viewDidLoad()
        // Do any additional setup after loading the view.

    }
}
①までで上記のコードまでできているかと思います。
次の順序を書いていきます。
- スライドViewが開いている時と閉じている時を判断するフラグを作る
- 開閉のメソッドを作る
- ボタンタがタップされた時のアクションを記述する
以上3点です。実際に記述していきます。
まず開いているのか、閉じているのかのフラグを作ります。
※始めは開いたままにしておきます。
var isExpanded: Bool =true
開閉のメソッドを作ります。
func showMenu(shouldExpand: Bool) {
    if shouldExpand {
        // show menu
        UIView.animate(withDuration: 0.5, delay: 0, usingSpringWithDamping: 1, initialSpringVelocity: 0, options: .curveEaseInOut, animations: {

           self.slideMenuView.frame.origin.x = 0

        }, completion: nil)
    } else {
        // hide menu
        UIView.animate(withDuration: 0.5, delay: 0, usingSpringWithDamping: 1, initialSpringVelocity: 0, options: .curveEaseInOut, animations: {

            self.slideMenuView.frame.origin.x = -240

        }, completion: nil)
    }
}
shouldExpandの引数がtrueであるなら0.5秒かけて元々の位置に戻す
shouldExpandの引数がfalseであるなら0.5秒かけてx座標を-240する
ボタンがタップされた時のアクションを記述します。
@IBAction func touchedButton(_ sender: UIButton) {
    isExpanded = !isExpanded
    showMenu(shouldExpand: isExpanded)
}
全てのコード
class ViewController: UIViewController {
    @IBOutlet weak var slideMenuView: UIView!
    var isExpanded: Bool = true
    @IBAction func touchedButton(_ sender: UIButton) {
        isExpanded = !isExpanded
        showMenu(shouldExpand: isExpanded)
    }

    override func viewDidLoad() {
        super.viewDidLoad()
        // Do any additional setup after loading the view.

    }

    func showMenu(shouldExpand: Bool) {
        if shouldExpand {
            // show menu
            UIView.animate(withDuration: 0.5, delay: 0, usingSpringWithDamping: 1, initialSpringVelocity: 0, options: .curveEaseInOut, animations: {
                self.slideMenuView.frame.origin.x = 0
            }, completion: nil)
        } else {
            // hide menu
            UIView.animate(withDuration: 0.5, delay: 0, usingSpringWithDamping: 1, initialSpringVelocity: 0, options: .curveEaseInOut, animations: {
                self.slideMenuView.frame.origin.x = -240
            }, completion: nil)
        }
    }
}
ビルドしてみると以下の下記の動画のようになります!
ABOUT ME
株式会社Playgroundのサービス
- 無料・簡単・片手でホームページを作成できる自社サービス Rakwi
- Web制作とアプリ開発を学べるオンラインプログラミング講座 Upstairs
- 開発,DX推進支援サービス スタートアッププラン


