こんにちは、株式会社PlaygroundのiOSエンジニア伊原です!
前回、Cloud Functionsからモバイルにリッチプッシュ通知を送信する方法を説明しました。
今回は、Cloud Functions で送信したPush通知をiOSアプリで受信する方法を紹介していきます。
- FirebaseにAPNs認証キーを登録
- AppDelegate.swiftを編集
- CapabilityにPush Notify を追加
- テスト送信
目次
Push通知送信のためにFirebaseプロジェクトにAPNs認証キーを登録しよう
Firebaseコンソール>プロジェクト設定>クラウドメッセージング を開きます。
iOSアプリのPush通知に必要なp8ファイルのアップロード
クラウドメッセージングを開くと、”iOSアプリの構成”という項目があります。
ここにAPNs認証キーをアップロードしていきます。
アップロードするファイルは、AppleDeveloperから取得する必要があります。
Apple Developer> Certificates, Identifiers & Profiles>Keys にあるファイルをダウンロードし、アップロードします。
※このファイルは一度しかダウンロードできないので、共同開発の場合はダウンロードした人に共有してもらいましょう。
キーとIDを入力
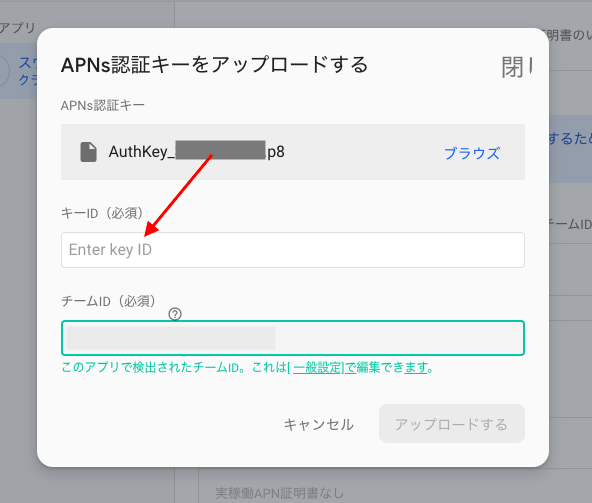
- キーIDにファイル名の”_”と”.p8”の間の文字列をコピペします。
- チームIDはAppleDeveloperのヘッダーの右側、自分の名前の下に書いてあります。(チーム名 – チームID)
iOSアプリにPush通知を送るためAppDelegate.swiftを編集する
Push通知送信に必要なFirebase Messagingのインストール
Firebaseのメッセージング機能を使うため、pod をインストールする必要があります。
pod fileに以下を追加し、 pod installを実行します。
Podfile
pod 'Firebase/Messaging'XcodeでAppDelegate.swift を開く
変更後のコードがこちらです。
AppDelegate.swift
import UIKit
import Firebase

@UIApplicationMain
class AppDelegate: UIResponder, UIApplicationDelegate {

    var window: UIWindow?

    func application(_ application: UIApplication, didFinishLaunchingWithOptions launchOptions: [UIApplication.LaunchOptionsKey: Any]?) -> Bool {
        // Override point for customization after application launch.
        FirebaseApp.configure()
        Messaging.messaging().delegate = self
        setRemoteNotification(application: application)
        return true
    }

    func applicationWillResignActive(_ application: UIApplication) {
        // Sent when the application is about to move from active to inactive state. This can occur for certain types of temporary interruptions (such as an incoming phone call or SMS message) or when the user quits the application and it begins the transition to the background state.
        // Use this method to pause ongoing tasks, disable timers, and invalidate graphics rendering callbacks. Games should use this method to pause the game.
    }

    func applicationDidEnterBackground(_ application: UIApplication) {
        // Use this method to release shared resources, save user data, invalidate timers, and store enough application state information to restore your application to its current state in case it is terminated later.
        // If your application supports background execution, this method is called instead of applicationWillTerminate: when the user quits.
    }

    func applicationWillEnterForeground(_ application: UIApplication) {
        // Called as part of the transition from the background to the active state; here you can undo many of the changes made on entering the background.
    }

    func applicationDidBecomeActive(_ application: UIApplication) {
        // Restart any tasks that were paused (or not yet started) while the application was inactive. If the application was previously in the background, optionally refresh the user interface.
    }

    func applicationWillTerminate(_ application: UIApplication) {
        // Called when the application is about to terminate. Save data if appropriate. See also applicationDidEnterBackground:.
    }
}

extension AppDelegate: UNUserNotificationCenterDelegate {
    func setRemoteNotification(application: UIApplication) {
        UNUserNotificationCenter.current().delegate = self
        let authOptions: UNAuthorizationOptions = [.alert, .badge, .sound]
        UNUserNotificationCenter.current().requestAuthorization(options: authOptions, completionHandler: {_, _ in })
        application.registerForRemoteNotifications()
    }


    // アプリがフォアグラウンドで起動している際にプッシュ通知が届いたら呼ばれる。
    func userNotificationCenter(_ center: UNUserNotificationCenter, willPresent notification: UNNotification, withCompletionHandler completionHandler: @escaping (UNNotificationPresentationOptions) -> Void) {
        completionHandler([.alert, .sound, .badge])
    }

    // プッシュ通知に対しタッチ等のアクションを行った時に呼ばれる。
    func userNotificationCenter(_ center: UNUserNotificationCenter, didReceive response: UNNotificationResponse, withCompletionHandler completionHandler: @escaping () -> Void) {
    }
}

extension AppDelegate: MessagingDelegate {
    // fcmTokenを受け取った時に呼ばれる。
    func messaging(_ messaging: Messaging, didReceiveRegistrationToken fcmToken: String) {
        if let uid = Auth.auth().currentUser?.uid {
            self.setFcmToken(userId: uid, fcmToken: fcmToken)
        }
    }

    func setFcmToken(userId: String, fcmToken: String) {
        let reference = Database.database().reference().child("user").child(userId).child("fcm_token")
        UserDefaults.standard.set(fcmToken, forKey: "fcmToken")
        reference.setValue(fcmToken)
    }
}
- クラウドメッセージングのDelegateを設定
- UNUserNotificationCenterDelegateを継承
- fcmトークンの保存
細かく見ていきます。
1.クラウドメッセージングのDelegateを設定(12行目)
MessagingDelegateの記述はないですが、Delegateを設定してあげる必要があります。
AppDelegate.swift
Messaging.messaging().delegate = self
2.UNUserNotificationCenterDelegateを継承(40行目〜57行目)
ここではUNUserNotificationCenterDelegateのメソッドを3つ呼んでいます。
AppDelegate.swift
extension AppDelegate: UNUserNotificationCenterDelegate {
    func setRemoteNotification(application: UIApplication) {
        // Delegateの設定
        UNUserNotificationCenter.current().delegate = self
        // プッシュ通知受信の許可を求める。
        let authOptions: UNAuthorizationOptions = [.alert, .badge, .sound]
        UNUserNotificationCenter.current().requestAuthorization(options: authOptions, completionHandler: {_, _ in })
        application.registerForRemoteNotifications()
    }


    // アプリがフォアグラウンドで起動している際にプッシュ通知が届いたら呼ばれる。
    func userNotificationCenter(_ center: UNUserNotificationCenter, willPresent notification: UNNotification, withCompletionHandler completionHandler: @escaping (UNNotificationPresentationOptions) -> Void) {
        completionHandler([.alert, .sound, .badge])
    }

    // プッシュ通知に対しタッチ等のアクションを行った時に呼ばれる。
    func userNotificationCenter(_ center: UNUserNotificationCenter, didReceive response: UNNotificationResponse, withCompletionHandler completionHandler: @escaping () -> Void) {
        let userInfo = response.notification.request.content.userInfo // 送信時に入れた情報をここで取得。
    }
}
1つ目のsetRemoteNotificationは、自動で呼ばれないため2行目で呼び出しています。
3.fcmトークンの保存(59行目〜70行目)
ユーザーが通知を許可すると、デバイスごとにfcmトークンが発行されます。
そのタイミングでfcmトークンをDatabaseに保存します。
AppDelegate.swift
extension AppDelegate: MessagingDelegate {
    // fcmTokenを受け取った時に呼ばれる。
    func messaging(_ messaging: Messaging, didReceiveRegistrationToken fcmToken: String) {
        if let uid = Auth.auth().currentUser?.uid {  //ログイン中のユーザーIDを取得
            self.setFcmToken(userId: uid, fcmToken: fcmToken)
        }
    }

    func setFcmToken(userId: String, fcmToken: String) {
        let reference = Database.database().reference().child("user").child(userId).child("fcm_token")
        UserDefaults.standard.set(fcmToken, forKey: "fcmToken")
        reference.setValue(fcmToken)
    }
}
CapabilityにPush Notifyを追加
Xcodeで [ Signing & Capabilities ] を開きます。
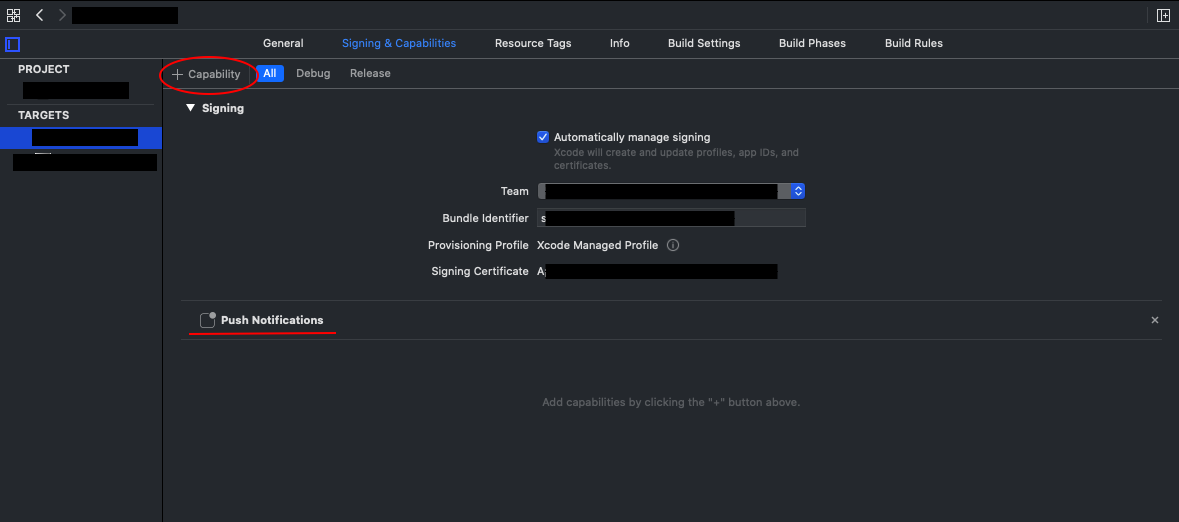 +Capabilityから、Push Notificationsを選択すると、下に表示されます。
この時、プロビジョニングファイル作成時にPush Notifyが選択されていないと選択肢に表示されませんのでご注意ください。
FirebaseコンソールからiOSアプリにPush通知をテスト送信
Firebaseコンソールのサイドメニューから、Cloud Messagingを開きます。
最初の[メッセージを送信]を押す>手順に沿って入力>送信ボタン
この流れでデバイスにテストメッセージを送ることができます。
※入力はほとんどが必須項目ではないので、最低限テキストとアプリ選択だけすればOKです。
以上で Push通知の受信実装は終わりです!
飛んできたPush通知を触った時に指定の画面に飛ぶ方法など、
Pushのカスタマイズも今後記事にしていこうと思います。
- 無料・簡単・片手でホームページを作成できる自社サービス Rakwi
- Web制作とアプリ開発を学べるオンラインプログラミング講座 Upstairs
- 開発,DX推進支援サービス スタートアッププラン